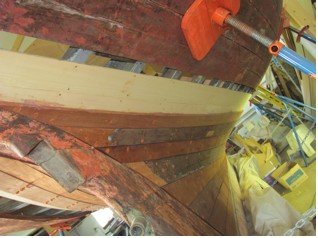
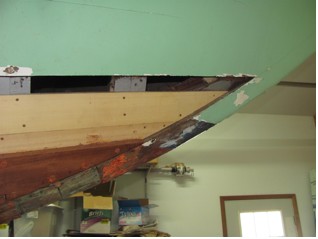
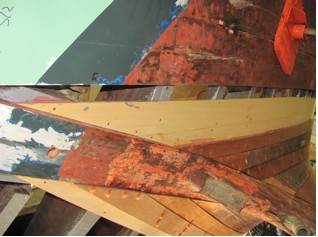
The second inner plank on the starboard side (IS2) is now complete. Below is a summary of what was done.
The following preliminary work was done previously:
- Make fastener plugs
- Remove S9 & S10, old IS2, part of IS3; wouldn’t hurt to remove one more plank to provide more clearance
- Plug old fastener holes
Day 1
- Cleaned and painted frames faces with Primocon (2 coats)
- Removed butt blocks from port-side spiling batten, breaking batten into sections
- Painted batten sections
- Measured width of S9 and S10 to determine width of IS2 (S9 + S10/2 = D, distance from top of S8 to top of IS2)
Day 2
- Marked top edge of IS2 onto frames, using dividers from top of S8 set a span equal to D; using fairing batten, extrapolated top edge to hood ends.
- Clamped batten sections to boat
- Modified hood end templates for starboard side
- Modified one old batten section to fill the remaining gap and clamped it to boat
- Made and glued new butt blocks
- Spiled top and bottom edges of IS2. In the future, I’ll mark the top-edge points after fitting the plank sections.
Day 3
- Removed spiling batten (made three reference marks in case I had to put batten back on boat)
- Reverse spiled IS2 plank aft onto 10” wide stock (unlike port side, I couldn’t get forward section out of same stock). Hood end to frames 38 to about 25
- Reverse spiled IS2 plank forward onto 8” wide stock. Hood end to frames 4 though 21
- Rough cut out sections + ½” allowance (width of fairing batten) for stress relief (didn’t move much); ¼” would be more than adequate, but not as easy to draw.
- Used left over piece from IP2 to extend length of IS2 aft (hood end to frame 19); scarfed on full width left over piece to rough cut aft section (resorcinol)
- Measured and recorded bevels on bevel board; bevels were slightly obtuse but not enough to worry about. Just planed top and bottom edges square using pocket plane with hardwood block to keep plane square.
- Checked for frame curvature. Forward frames are slightly concave (maybe 1/16”) but plank can be bent to accommodate (no scrubbing needed)
- Steps f and g could have been done on day 1.
Day 4
- Reverse spiled both sections and cut close to the line; need to be more careful cutting bottom edge (concave). Saw tends to walk toward line and then back of blade cuts closer to line when saw is adjusted.
- Planed bottom edge of forward section to line and fit section to boat (2 iterations for <0.022”); thicker is better than thinner for planing edges – more bearing surface; make reference mark at mid point of both sections so that it’s easy to reposition them on the boat
- Repeat for aft section
- Mark location of forward edge of frame 20 on both sections (provides a common reference)
- Layout both sections on bench and line up reference marks; bottom edges line up well between frames 19 and 21; top edges still rough; Finished top edges of both sections need to be in alignment for the length of the scarf (5”). So with the two sections clamped together (bottom edge aligned between frames 19 through 21), I planed both top edges so that they matched. Then I unclamped the two sections and checked that the top edges were about the same distance from their respective lines. This should always work with a 3 frame overlap between sections. So with both top and bottom edges matching, between frames 19 and 21, I decided to put scarf about center of frame 20.
- Planed top edge of both section to just remove the line
- Plane sections to final thickness; planer produce a scalloped surface. Fixed planer. Problem was that knife blades were set too high so feed rollers were barely engaged during light cuts. Adjusted blades (start of cutting edge just where the blade exits the arbor.
- Layed out and cut scarf (5”)
- Glued up on boat; no problem locating scarf at a frame.
Day 5
- Remove plank and cleaned up scarf; not much to do.
- Paint inside face (2 coats Primocon); should avoid painting hood ends if I’m applying sealant, but I didn’t do this
Day 6
- Scrap away paint at hood ends; apply 215 primer
- Nail plank to boat; wedging down; Sikaflex 291 LOT at hood ends.
- Plane IS1/IS2 interface to eliminate step differences in thickness; Very little planing required.
Notes:
- Thickness planing – when to do it? We would like to minimize planing time, so planing once to final thickness at the end is attractive; however, there are other considerations:
- Although planing at the end makes for a nice finished plank, planing a full-length plank is awkward.
- The stock for the inner planks must be resawn into two thinner slabs. Planing rough stock before resawing makes it easier to push stock through the saw; however, conserving thickness might be more important.
- After resawing stock into two slabs, the thickness of slabs might be different. For scarfing, the thickness of the slabs should be the same, so planing the slabs to uniform thickness is indicated.
- If a scarf joint isn’t perfect some planing will be necessary to clean up the joint, but this can be done with just some light hand planing.
- Planing will remove any reference marks on the plank face. So planing should be done after the reference marks are no longer needed.
- Any scrubbing must be done after planing to final thickness, or the planing will remove the scrubbing.
- Thicker is better than thinner for trimming edges, so this suggests planing to final thickness after plank has been fitted and top edge trimmed to line. Also, keeping the extra thickness until the end, protects the plank.
- So it looks like you need to plane three times: (1) to clean up the stock for resawing; (2) to achieve uniform slab thickness before scarfing; (3) to reach final thickness either (a) before fitting the plank sections if scrubbing is required, or (b) after the plank sections have been fitted but before final glue up, or (c) after the final glue up.
- Scarfing the inner planks.
- Best if both sections have same thickness.
- For lengthening the stock after resawing, a 4” scarf should be adequate. The thickness of the slabs is typically .44” – .5” producing a 9:1 to 10:1 scarf joint.
- For the final scarf, a 5” scarf produces about a 13:1 scarf joint